Suspended Ceiling Seismic Bracing Under AS 1170.4: What Builders Need to Know
Suspended ceilings are the most commonly non-compliant element in Australian buildings. Here's what AS 1170.4 Section 8 requires, how bracing is designed, and what certification looks like.
Suspended Ceiling Seismic Bracing Under AS 1170.4: What Builders Need to Know
Suspended ceilings are the single most commonly non-compliant element identified during seismic compliance audits of Australian buildings. The 2011 Christchurch earthquake demonstrated catastrophically what happens when ceiling systems fail — falling ceiling tiles and grid systems caused injuries, blocked emergency exits, and rendered buildings unusable. In Australia, AS 1170.4 Section 8 and AS/NZS 2785:2020 Suspended Ceilings — Design and Installation set the requirements for seismic-resistant ceiling systems. Here is what builders need to know.
Why Ceilings Are the Highest-Risk Non-Structural Element
Suspended ceilings are particularly vulnerable to seismic damage for several reasons:
- They are heavy (a standard plasterboard ceiling weighs 12–15 kg/m²)
- They span large areas with minimal lateral restraint in conventional installations
- They contain penetrations for lights, sprinklers, and air diffusers that create weak points in the grid
- They are installed late in the construction sequence, after structural decisions have been made
In the Christchurch earthquake, ceiling failures were responsible for a significant proportion of the injuries in commercial buildings. Post-earthquake investigations found that most failures were caused by inadequate or absent seismic bracing — bracing that was required by the applicable standard but had not been installed.
What AS 1170.4 Section 8 Requires
Section 8 of AS 1170.4 governs the seismic design of non-structural parts and components, including suspended ceilings. The design process involves calculating the horizontal earthquake force (Fc) applied to the ceiling system:
Fc = [kp × Z × Ch(0)] × ax × [Ic × ac / Rc] × Wc
Where:
- kp = probability factor (based on design life)
- Z = hazard factor (site-specific, from postcode lookup)
- Ch(0) = spectral shape factor (based on site sub-soil classification)
- ax = height amplification factor (increases with floor level)
- Ic = component importance factor
- ac = component amplification factor (1.0 for ceilings)
- Rc = component ductility factor
- Wc = seismic weight of the ceiling
This force is then used to design the bracing system — the wires, rods, and clips that restrain the ceiling grid against lateral movement during a seismic event.
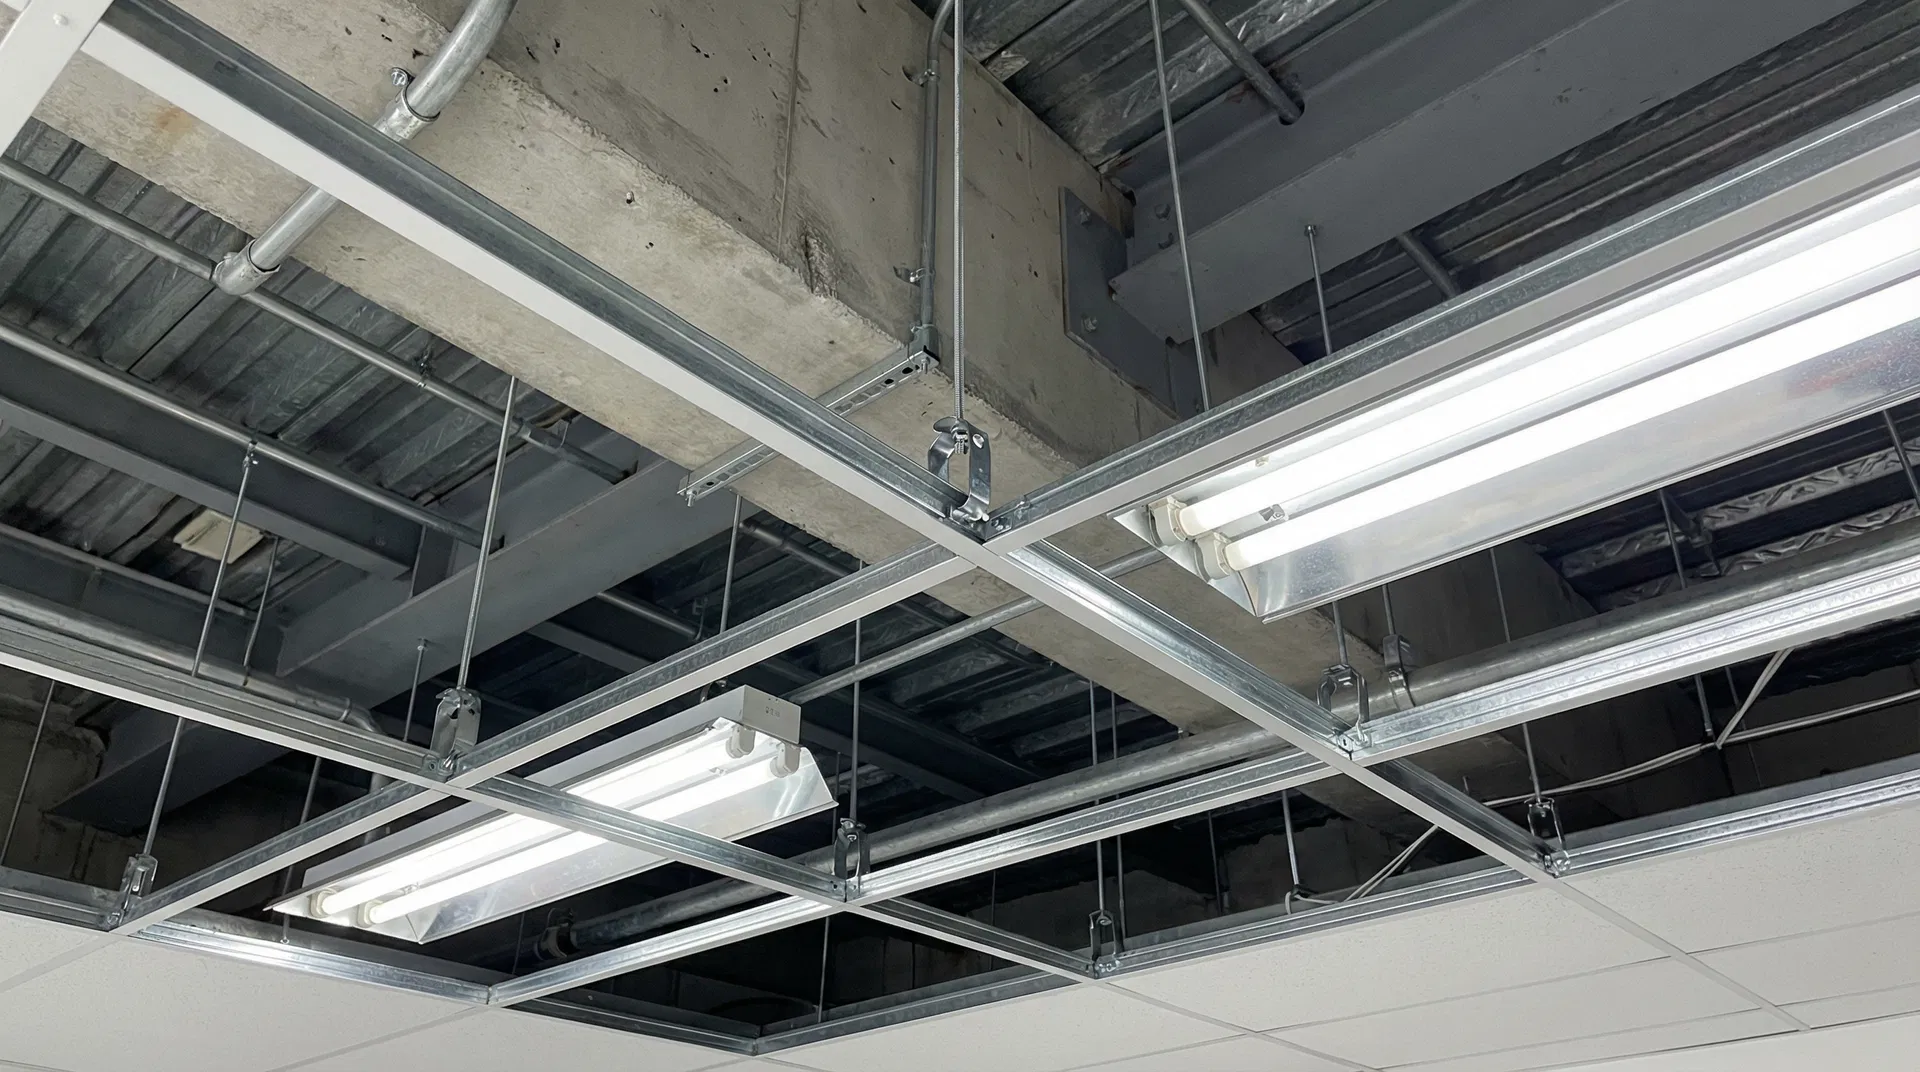
AS/NZS 2785:2020 — The Ceiling-Specific Standard
AS/NZS 2785:2020 Suspended Ceilings — Design and Installation is the companion standard to AS 1170.4 for ceiling systems. It specifies:
- Minimum bracing wire spacing (typically 1,800 mm × 1,800 mm grid for standard systems)
- Bracing wire angles (45° to 60° from horizontal is optimal)
- Connection requirements at the ceiling grid and at the structural soffit
- Perimeter clearance gaps to allow for inter-storey drift without the ceiling being crushed against walls
- Special requirements for penetrations (lights, sprinklers, diffusers)
The 2020 update to this standard introduced more stringent requirements for ceiling systems in higher seismic zones and for buildings with higher importance levels.
The Certification Process for Ceiling Systems
Ceiling seismic compliance certification follows a defined sequence:
Step 1: Product selection. The builder or ceiling contractor selects a ceiling system. Major manufacturers (Knauf, Rondo, USG Boral, Armstrong) publish seismic compliance data for their systems, including maximum spans, bracing requirements, and test results. Using a system with published compliance data significantly reduces the engineering effort required.
Step 2: Engineering design. A parts and components engineer calculates the Fc for the ceiling system at each floor level, determines the required bracing density, and prepares bracing drawings showing wire locations, angles, and connection details.
Step 3: Installation. The ceiling contractor installs the system in accordance with the approved drawings. This includes installing bracing wires at the specified spacing, ensuring perimeter clearance gaps are maintained, and using approved fixings at all connection points.
Step 4: Inspection. The parts and components engineer inspects the installed ceiling to verify compliance with the approved drawings. Common deficiencies identified at inspection include:
- Bracing wires installed at incorrect angles
- Insufficient bracing wire density (wires omitted to reduce cost)
- Perimeter clearance gaps filled with sealant (negating the drift allowance)
- Penetrations not detailed correctly
Step 5: Certificate of compliance. Once the inspection is passed, the engineer issues a certificate of compliance for the ceiling system. This certificate is submitted to the building surveyor as part of the occupancy certificate application.
Common Non-Compliance Issues
The most frequently identified ceiling seismic compliance failures in Australian buildings are:
| Issue | Consequence |
|---|---|
| No seismic bracing installed | Complete non-compliance; rectification required |
| Bracing wires at incorrect angles | Reduced lateral capacity; may require additional wires |
| Perimeter gaps sealed | Ceiling will be damaged in a seismic event; rectification required |
| Penetrations not detailed | Weak points in the grid; additional fixings required |
| No compliance certificate | Building surveyor cannot issue occupancy certificate |
Getting Your Ceiling System Certified
SeismicCert AU connects builders and ceiling contractors with accredited parts and components engineers who specialise in AS 1170.4 Section 8 ceiling compliance. Upload your ceiling drawings and product specifications, and receive a fixed-price quote for design, inspection, and certification.